How I use Frequency Separation for Skin

I love using frequency separation for skin because you can take care of shadows or inconsistent skin tones without over smoothing or over processing. No one wants plastic skin!! This technique separates the color from the texture, allowing you to adjust the tones, and imperfections.  For my example I am using a picture of my nephew.  And while his sweet little baby skin is PERFECT, he does have a little stork bite right in the middle of his forehead, and some tiny tiny bumps.  Using frequency separation is the perfect tool for taking care of this.

Here is my image before:

cute baby before editing image, Callihan photography

And here is the final image:

final image, Columbus, Indiana Family and child photographer, Callihan photography

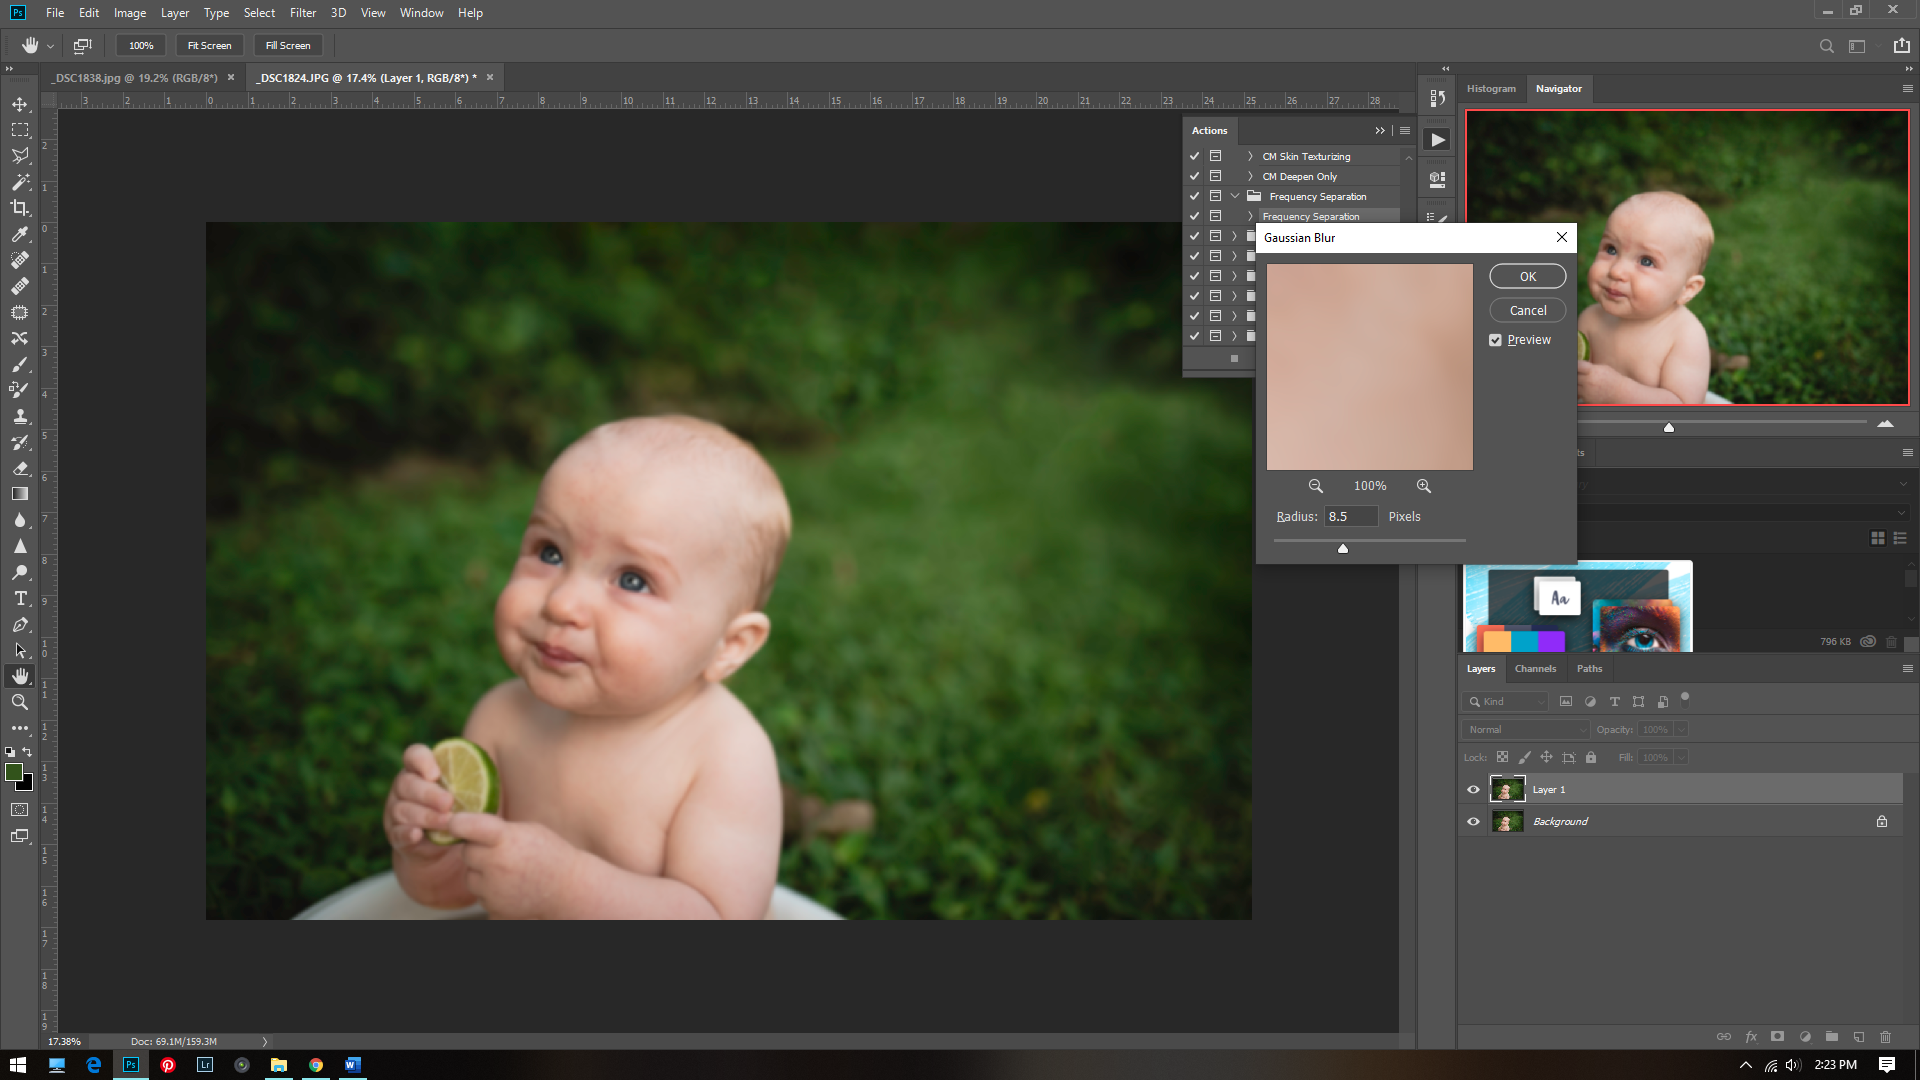
After making my normal adjustments I start by making 2 virtual copies of my image using ctrl+j. I rename one layer high and one layer low.  Put them in a group folder. I then use a Gaussian blur over the lower layer and set the radius around 8. This may vary.  

Columbus, Indiana family and child photographer, Callihan Photography Photoshop example

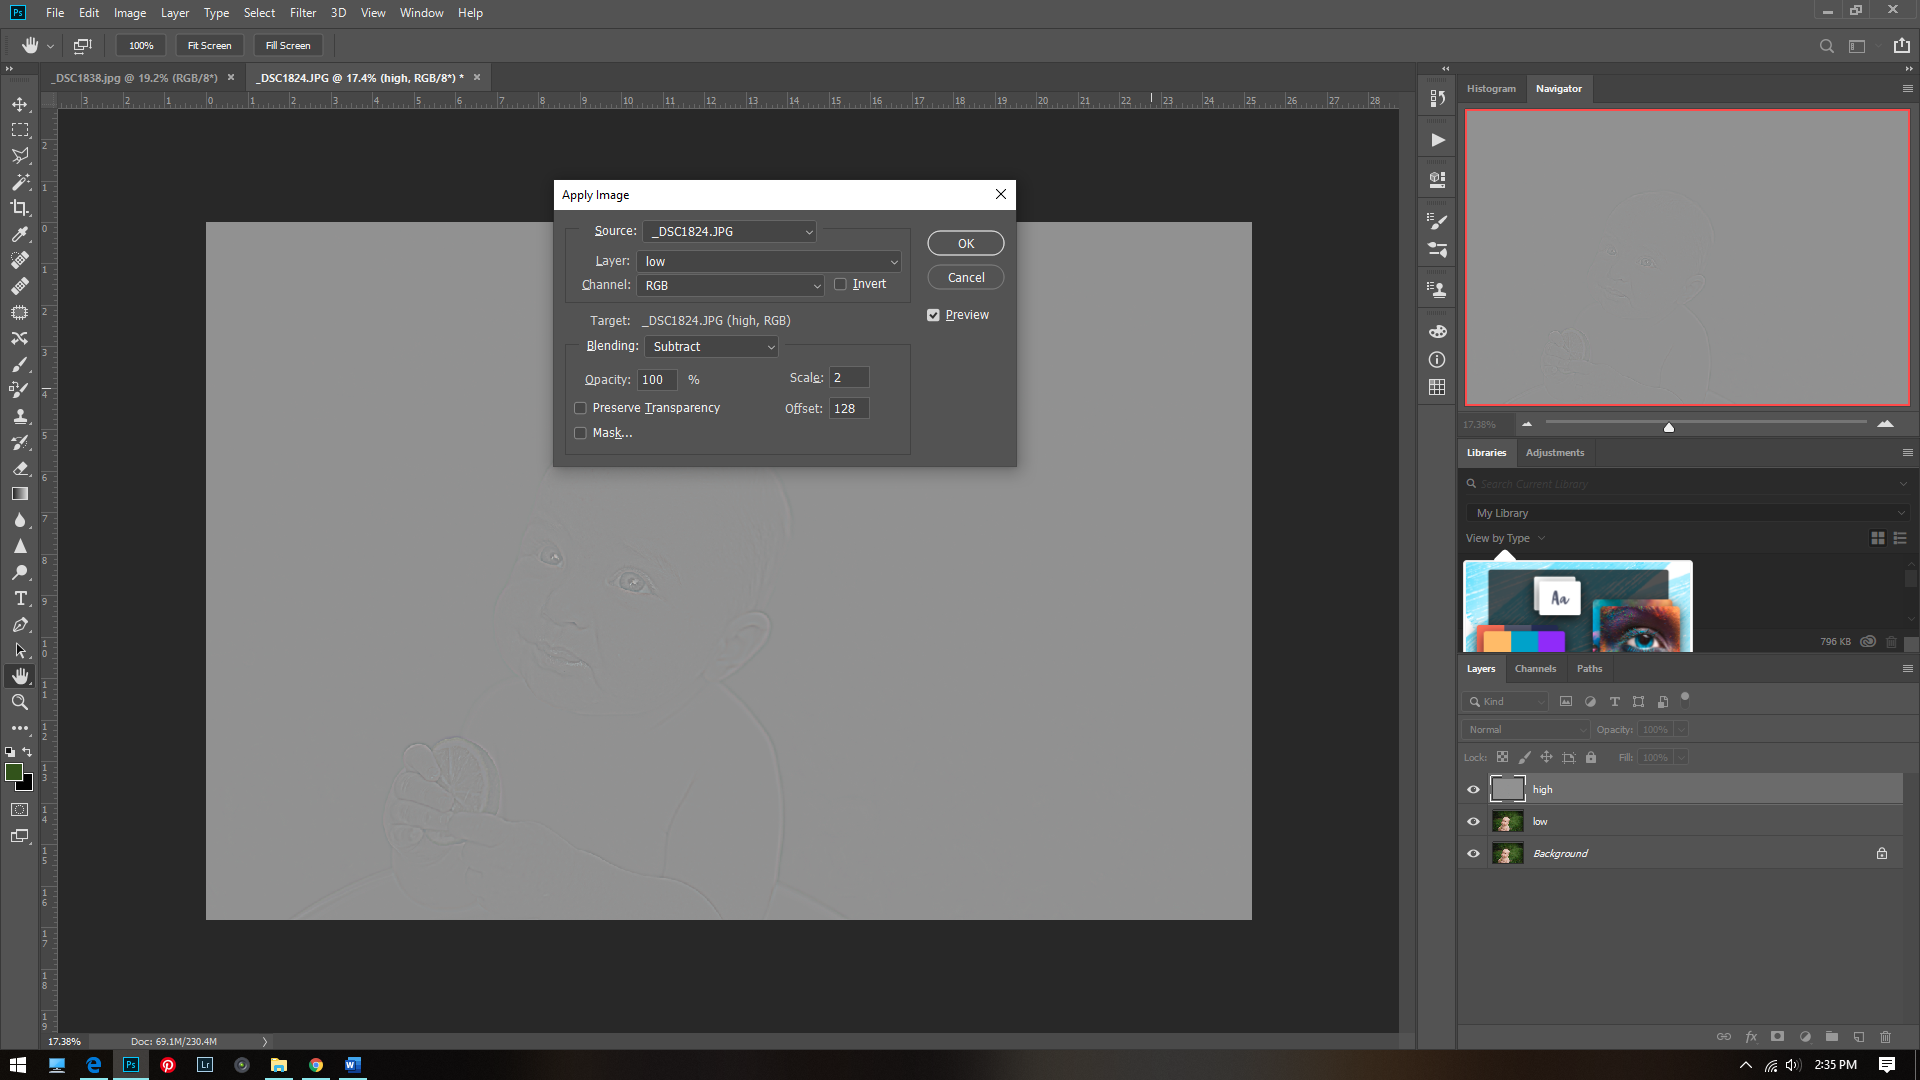
For my top layer I use  Image>apply Image. Then set the layer to Low, and the channel to RGB. Set the blending to Subtract, and the scale to 2, and the offset to 128. Set this layer to linear light.

Photoshop example for frequency separation, Columbus, Indiana Photographer, Callihan photography

For the next part I like to turn off the high layer and look for red patches or inconsistent colors.  I then use the patch tool (the shortcut is j).  I then go around all the places I see inconsistencies and correct them with the patch tool.

fixing inconsistent skin tones with frequency separation

I then turn the high layer back on and use the patch tool on it to correct any tiny bumps, or rough skin.

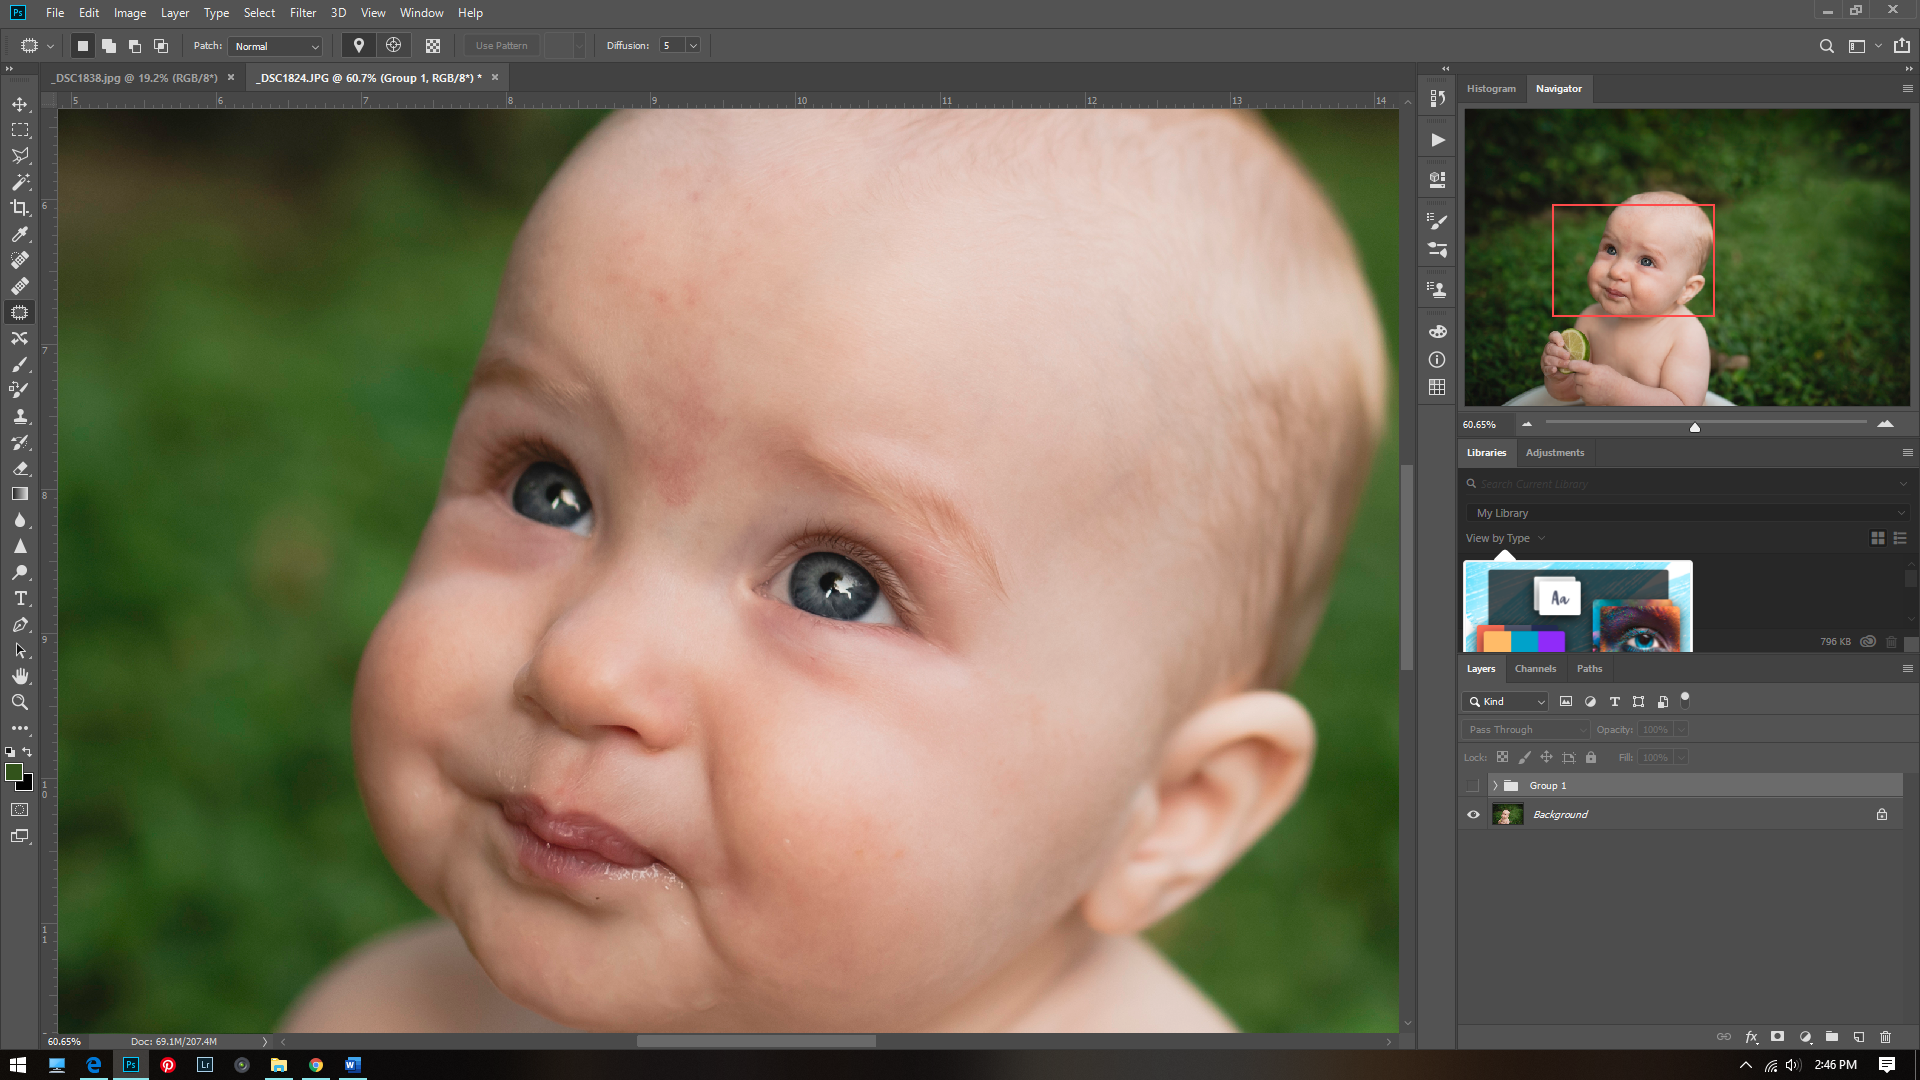
And there you have it! Here is the before:

before image screen shot, Columbus, Indiana photographer, photoshop example

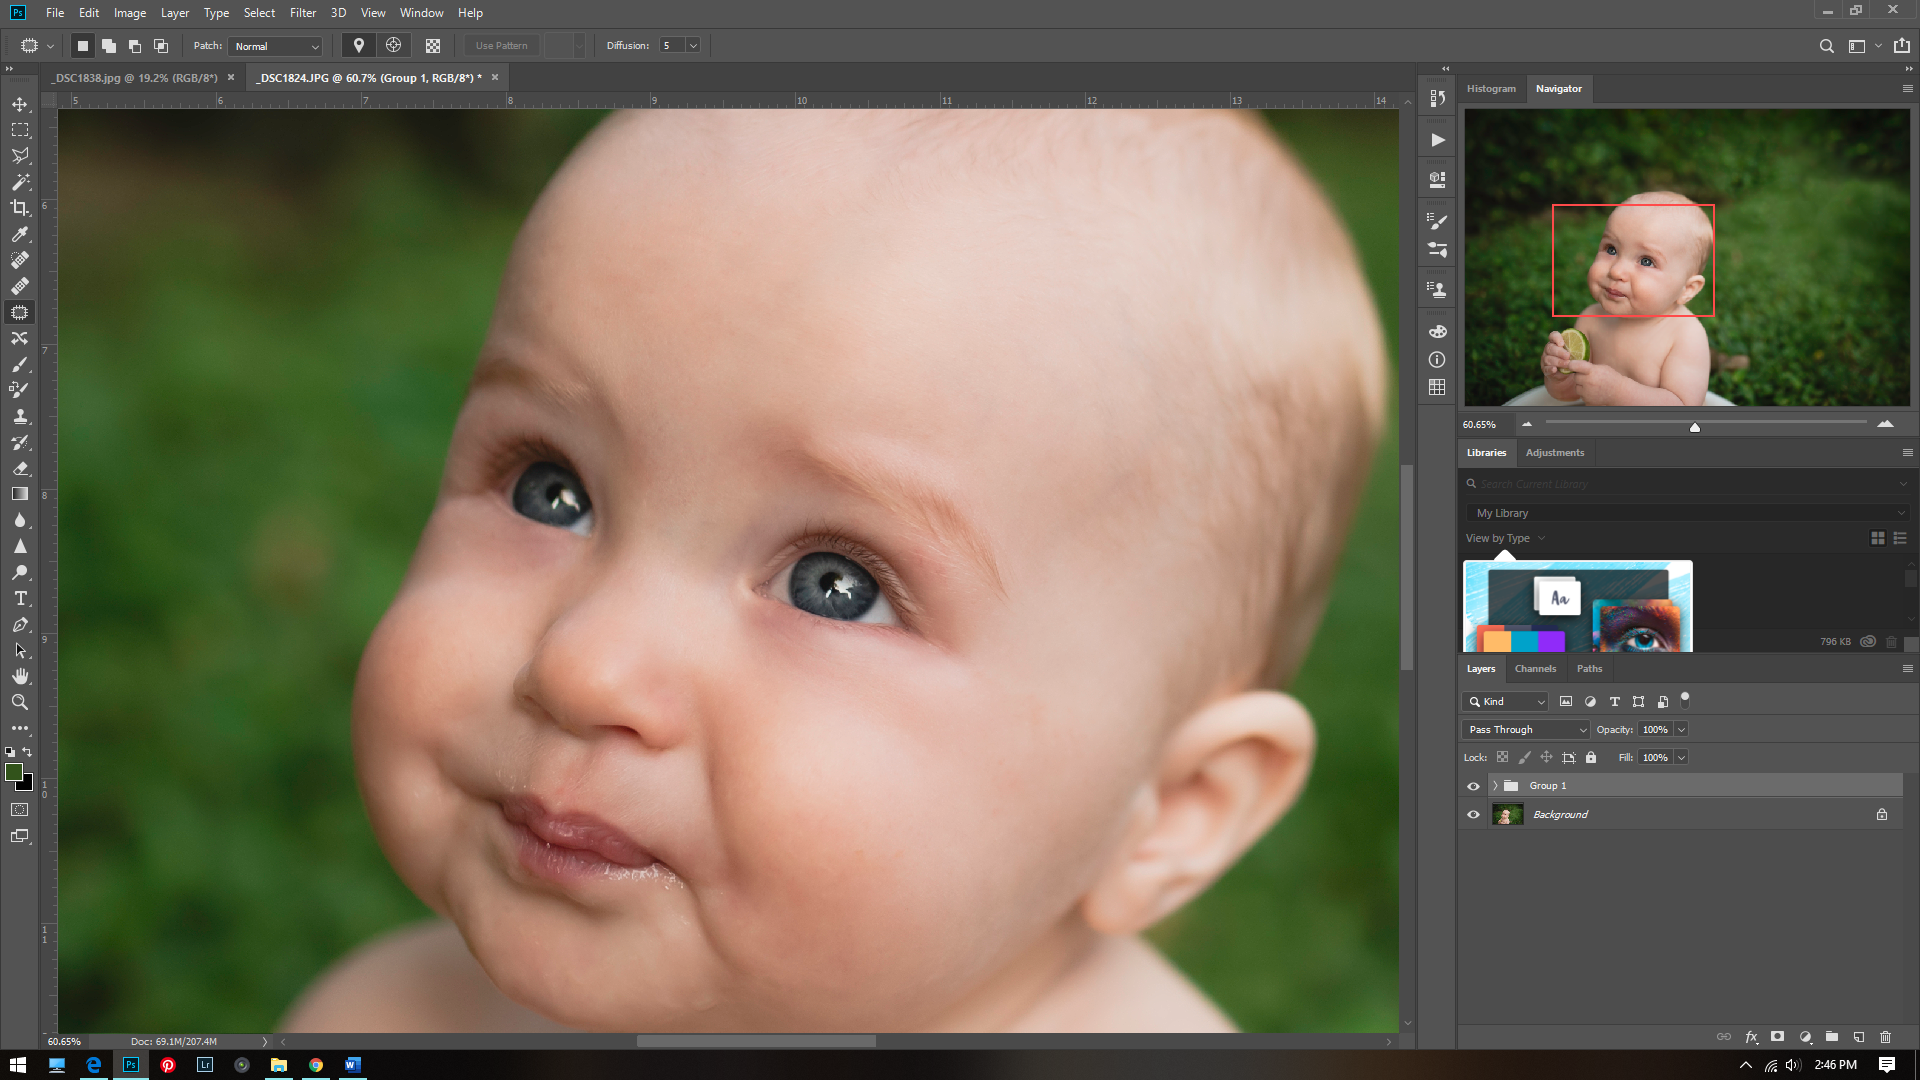
And the after:

correcting skin tones example in adobe photoshop, Columbus, Indiana Photographer

It is subtle adjustments like this that can make a big difference.  Frequency separation works well for acne, undereye circles, birthmarks, weird shadows, basically all skin issues!! Phlearn has an excellent Photoshop action for frequency separation you can purchase here.

Here’s just a few more from this adorable session.

 Thanks for reading!!

10 Elements of Composition for Photography

  1.      The Rule of Thirds

    This one is a simple one to employ. If you divide your frame into 9 equal squares, then you should place your subject on the lines of intersection.  Horizons should go on these lines as well and you should avoid placing them directly in the middle (in between the lines).  This will help to add interest in your image.

Rule of thirds, photography composition tutorial, Columbus, IN

2.      Symmetry

It helps a strong center composition to have perfect symmetry on either side of your subject.  If you have ever watched a Wes Anderson film, you will notice how he uses this often. See here. This is one of my favorite compositions to use.  I feel like it brings a sense of whimsy and peace to the image. Symmetry is very pleasing to the eye.

Symmetry, elements of composition, Columbus Indiana photographer

3.     Negative Space

Having a lot of negative space around your subject helps to draw attention to them in a minimalist way. There are no distractions to draw the eye away with this composition.

negative space, rules of composition, Columbus Indiana photographer

4.      The Golden Triangle

This one takes a bit of intention to pull off.  Be aware of strong diagonals going throughout the image.  Sometimes they are more implied.  Other times it is a direct line.              

Golden triangle example, Columbus Indiana photographer, rules of composition tutorial

5.     Isolate the Subject

Using a wide aperture as low as f/1.4 will help the focus to fall on your subject and the background will fade away into a blur. This will give you a shallow depth of field.  This gives a dreamier effect and is great for portraiture.

Isolate the subject example, elements of composition, Columbus, Indiana photographer

6.       Color

Using analogous colors or complimentary colors will help bring attention to your subject.  For this picture the girl’s hoodie is the same color as the lemur’s eyes. Color harmonies are also very pleasing.  I love using the primary colors!

color example, rules of composition, tutorial, Columbus, IN photographer

7.    Fill the frame

This is where you get very close to your subject so that very little if any space is seen around them. This draws the attention right to your subject.  Cropping in very tightly works well for this, just make sure to not chop limbs in an unpleasing way.  For more information on limb chops go here.

Fill the frame, composition element, Columbus, Indiana Photographer

8.      Leading lines

This is exactly how it sounds.  Look for lines or paths that will lead your eyes to the subject. You want these lines to take your eyes deeper into the frame. They do not have to be straight, sometimes a curved path can take you deeper into the image.

Leading Lines example, Columbus, IN Photographer, Tutorial

9.      Foreground and Depth

This is essentially layering.  Having a strong foreground, middle ground and background can help add visual interest. In this picture the plant is the foreground, the baby is the middle ground and the grandmother is the background.

Foreground and depth, Composition example, Columbus, Indiana Photographer

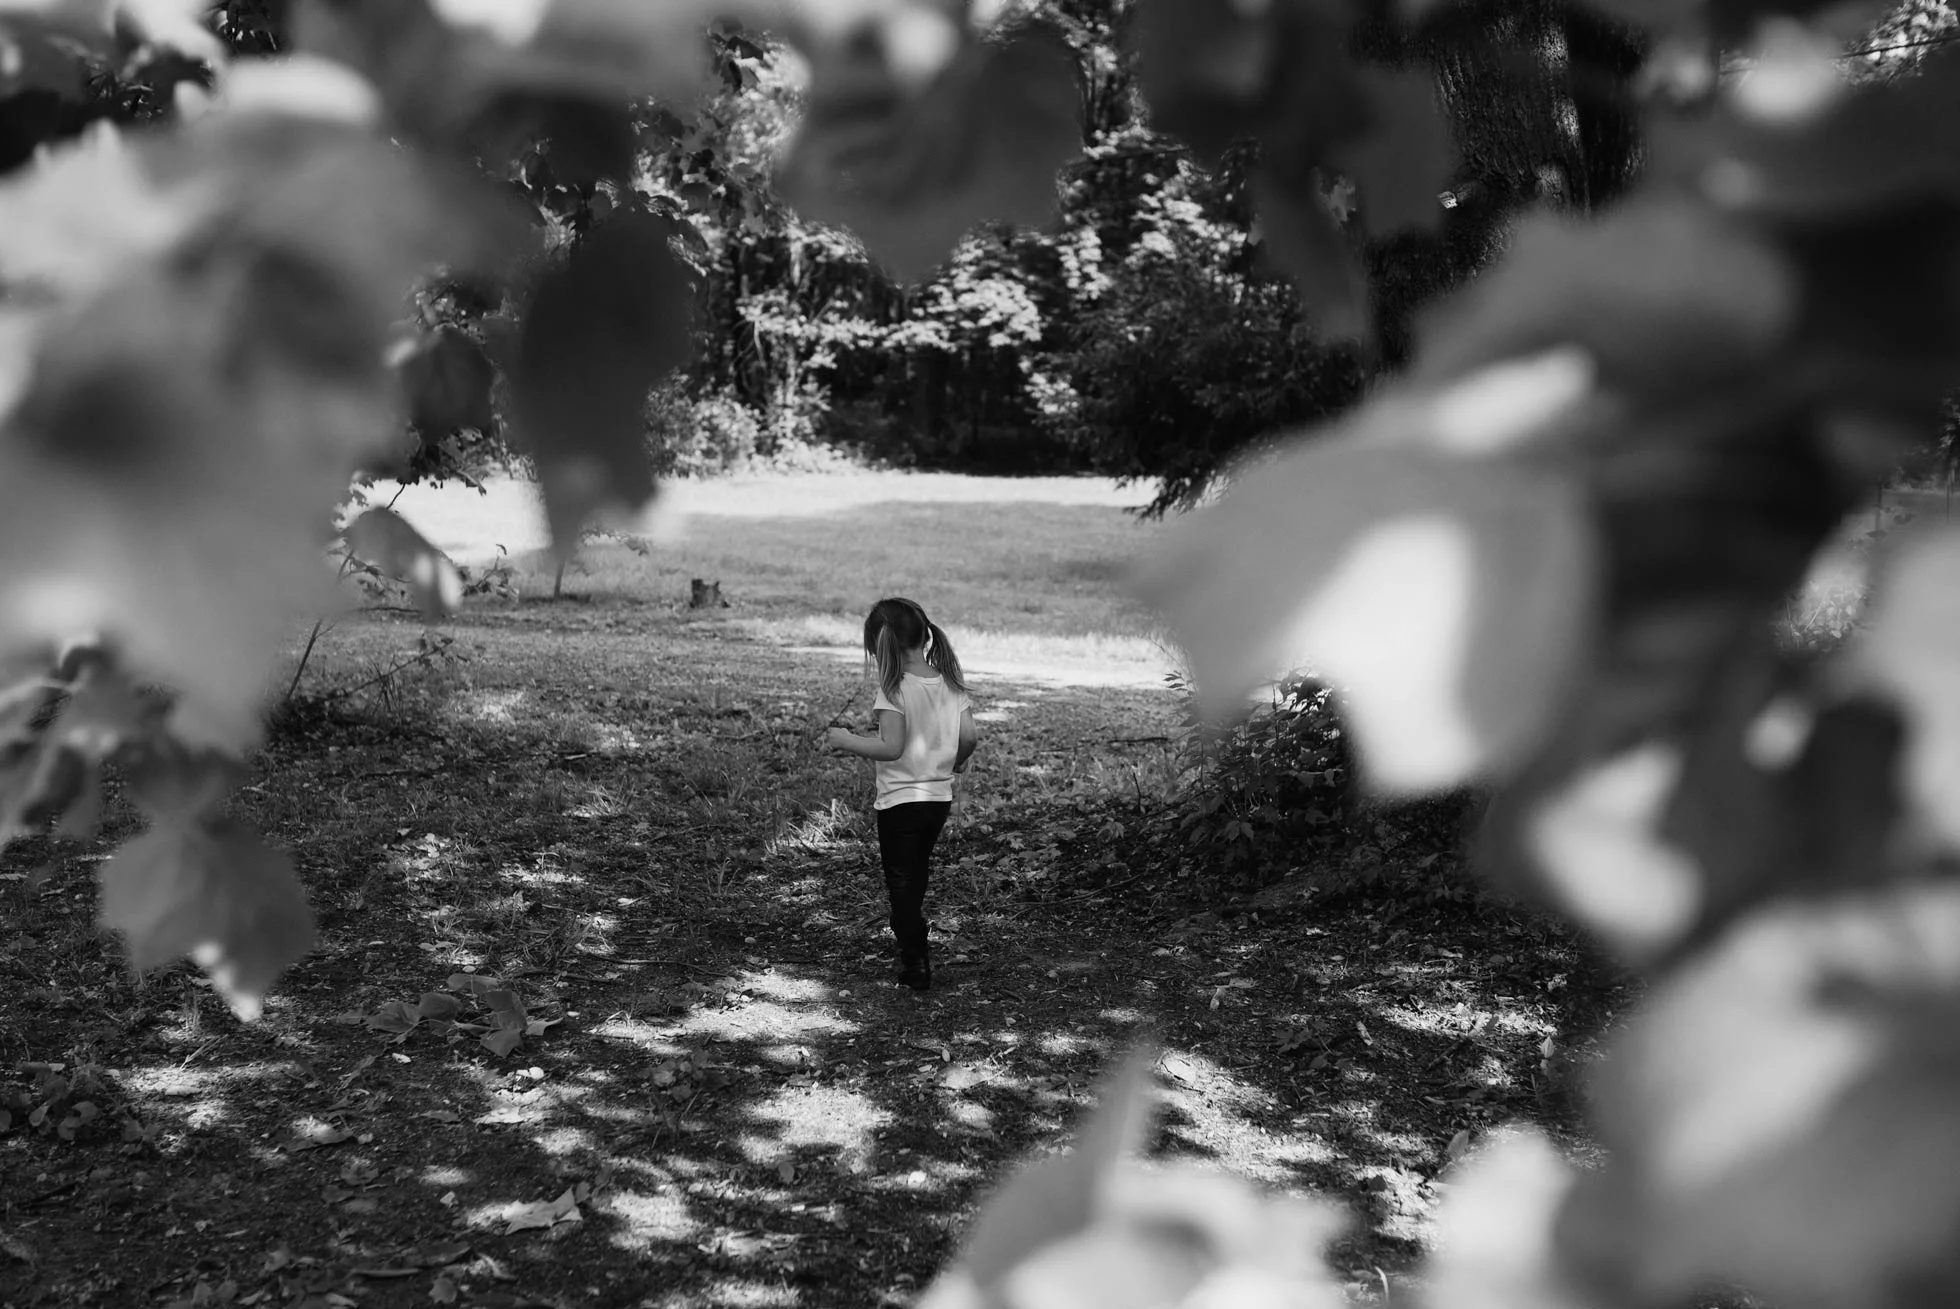
10.      Framing

This one is my favorite! I love shooting through things to frame my subject.  In this case the leaves do the job.  But you can use anything! People, nature, buildings, even light! The possibilities are endless.

Framing example, Columbus, IN photographer, composition rules

Hope this is helpful! If you’ll like, you can read more here. Thanks for reading.

How to Enhance a Sky in Lightroom

First off, I would say you need to start with a good image right out of the camera.  This idea took my photography to the next level. I wanted to take whatever pictures I could and then go edit them in photoshop.  While this was fun and helped me to learn a ton about photoshop, it wasn’t until I took my technical skills seriously that I really saw a difference in my photography.  So, for an amazing sky you need to expose the picture properly.  I prefer shooting in raw now, but I didn’t when I was starting out.  I found that the constraint of a jpeg helped motivate me to get a better picture in camera.  Now that I think about it, that probably wasn’t the norm!

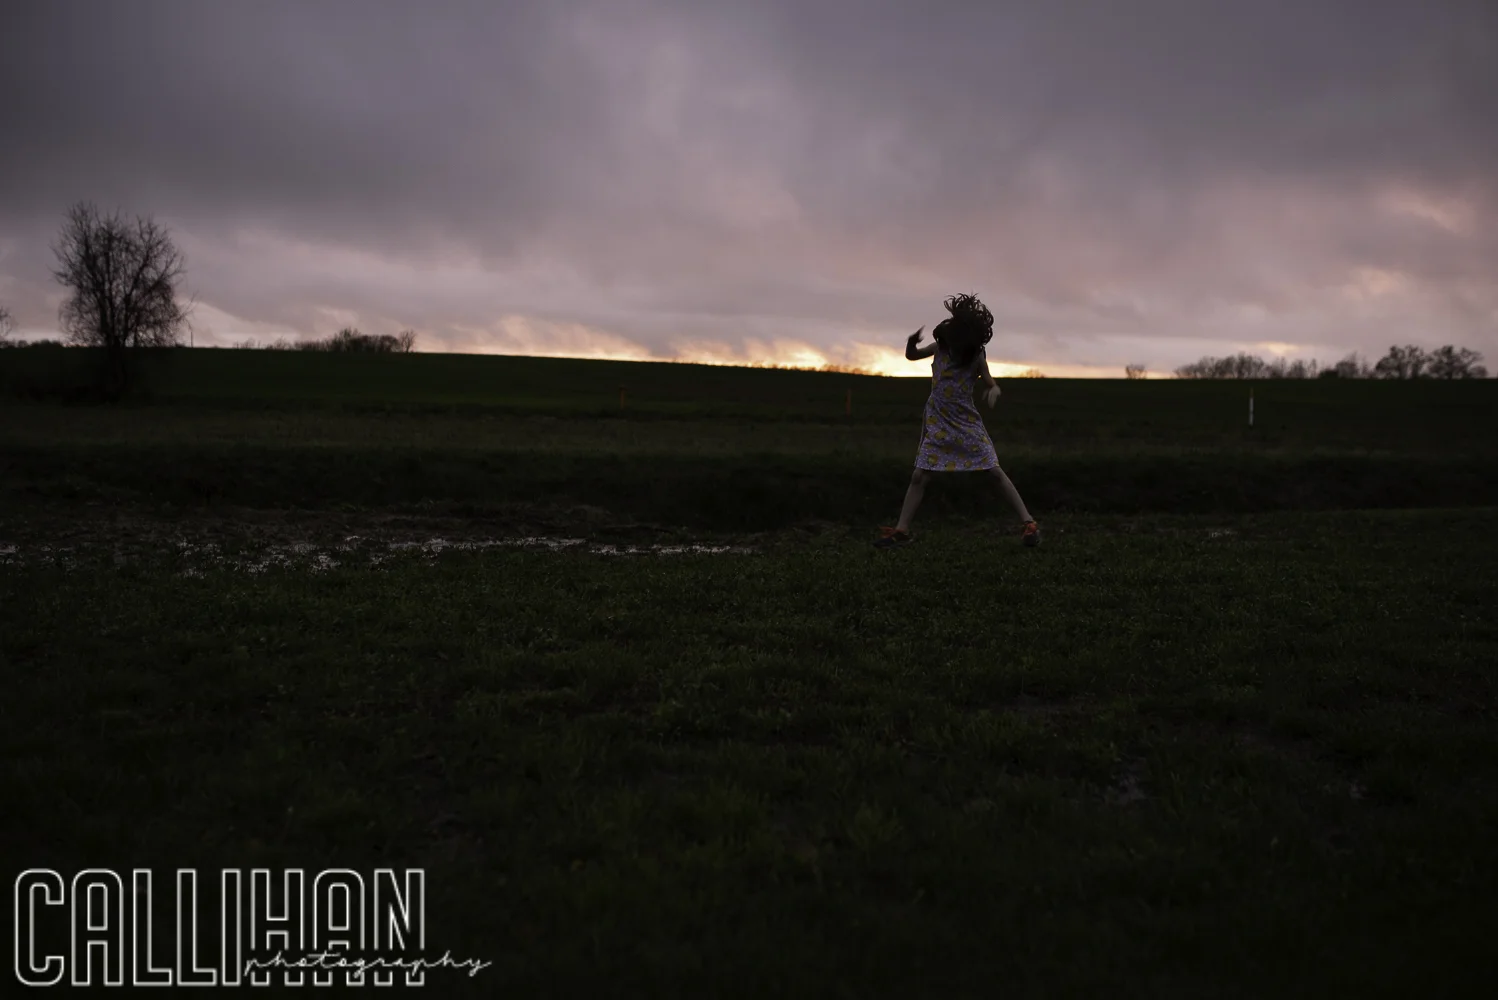
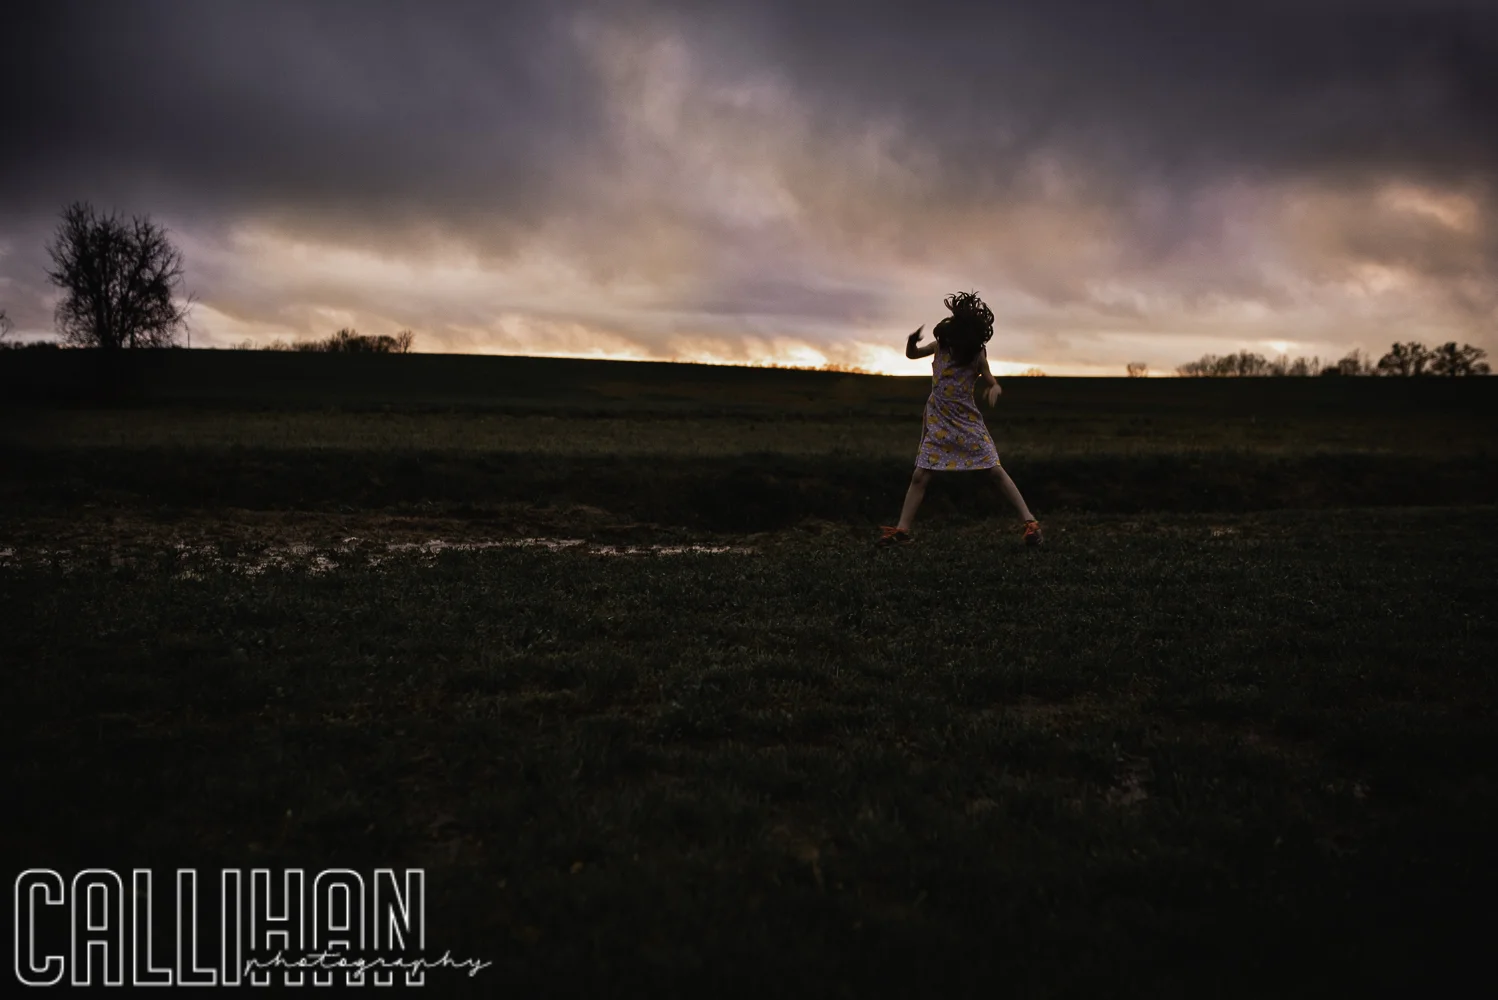
I have three examples of a sky that I enhanced in Lightroom. Here is the first one sooc (straight out of camera). 

Columbus, Indiana Family Photographer, Sunset rainy day sky, tutorial

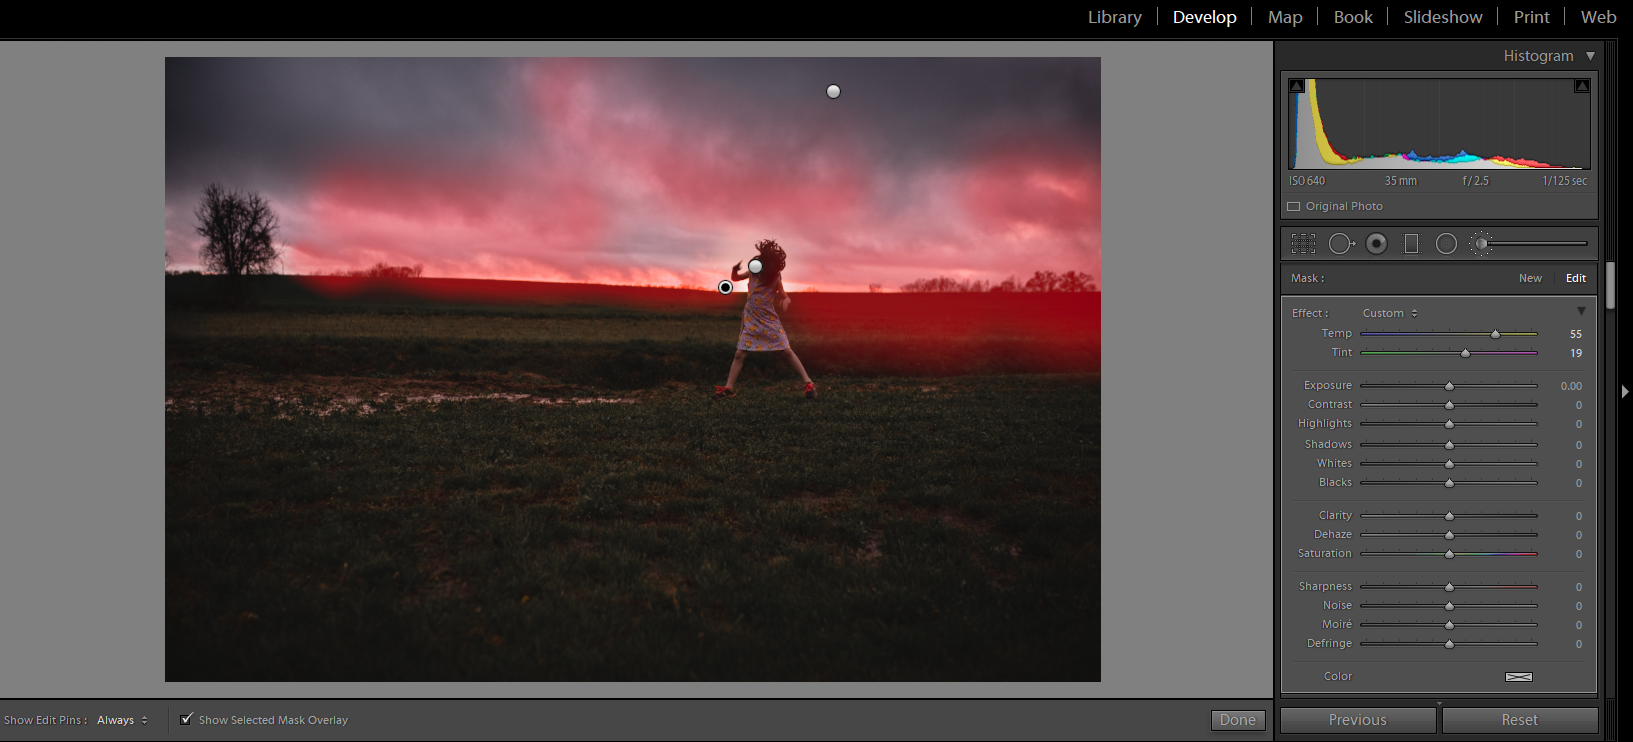
This one is shot closer to blue hour. The sun was down, and it was already very dark.  In hind sight I should have had my shutter speed up and ISO up as well (since there is a bit of motion blur).  However, I was in a hurry because I was losing light. I still love the sky. So I do my regular adjustments first.  Then to enhance the sky I look at the colors that are already there. I use the brush tool, and I adjust the temperature and tint to give a more golden tone.  Then I use a soft brush to paint the areas where the light is coming through.

Lightroom Tutorial, Brush tool, Columbus IN Photographer

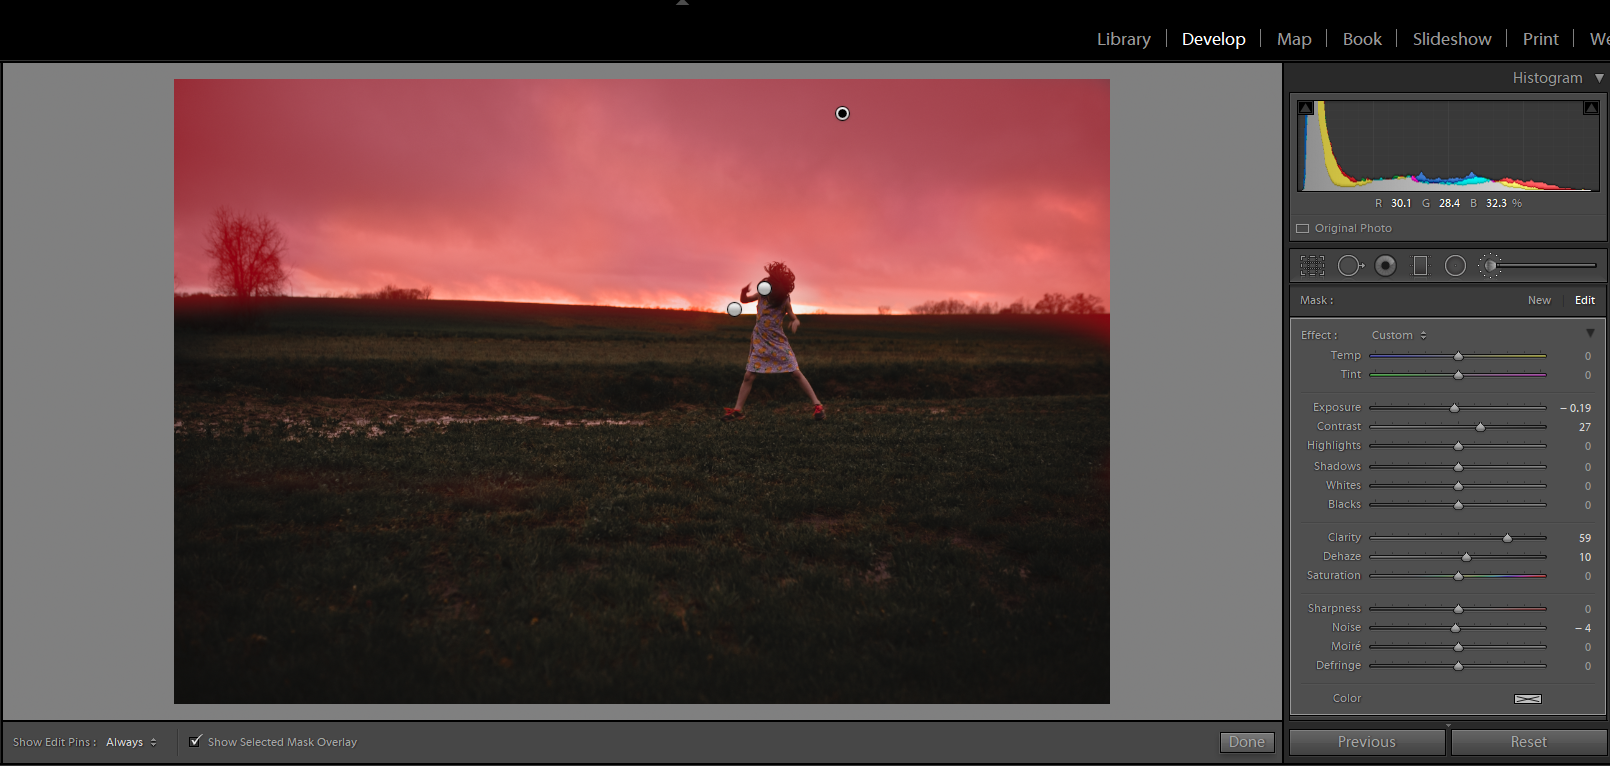
Next, I use a new brush to paint over the whole sky (carefully going around my subject).  Here, I increase the contrast, and the clarity.  I also lower the exposer and dehaze it slightly. After I have done that, I lighten the exposure of my foreground just slightly to make it look more natural.  You don’t want to go overboard with that part though.  It will not look right if you have a gorgeous sunset sky and a foreground and subject that looks like they’re lightened to be midday.  So just be careful with that part.  I try to make many small and subtle changes.  I don’t want to add what is not already there.

Brush tool screenshot tutorial, Columbus, Indiana Photographer

Here is the final image after all my adjustments.

Lightroom tutorial, Columbus Indiana Photographer

In the second picture I have exposed properly for the sky.  Here is the image sooc.

Enhancing the sky in Lightroom, Columbus, Indiana Photographer

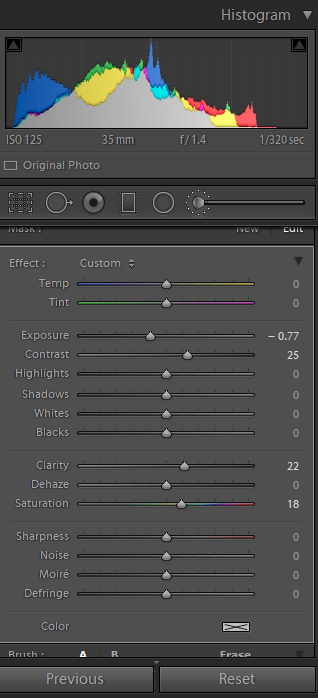
After doing my regular adjustments I use the brush tool again and go over the whole sky.  I lower the exposure, increase the contrast, increase the clarity and increase the saturation.  I don’t often use the saturation slider as it can easily get out of control, but for this one I think it worked well.

Screen shot of adjustments for Lightroom Tutorial, how to enhance a sky, Columbus, IN photographer

Here is the final image after adjustments.

Final Image Lightroom tutorial, Columbus, IN Photographer, Midwest

For this last one, I exposed for my subject.  Even though I underexposed slightly I still blew out some of the sky.

Lightroom Tutorial, How to Enhance a Sky, Columbus, IN Photographer

So, for this one I made my usual adjustments and then I went in with the brush tool.  I painted over the whole sky and lowered the exposure significantly. I also increased the contrast and warmed up the temperature/tint.

Slider adjustments for exposure and contrast, Lightroom Tutorial, Enhancing a sky, Columbus, IN Photographer

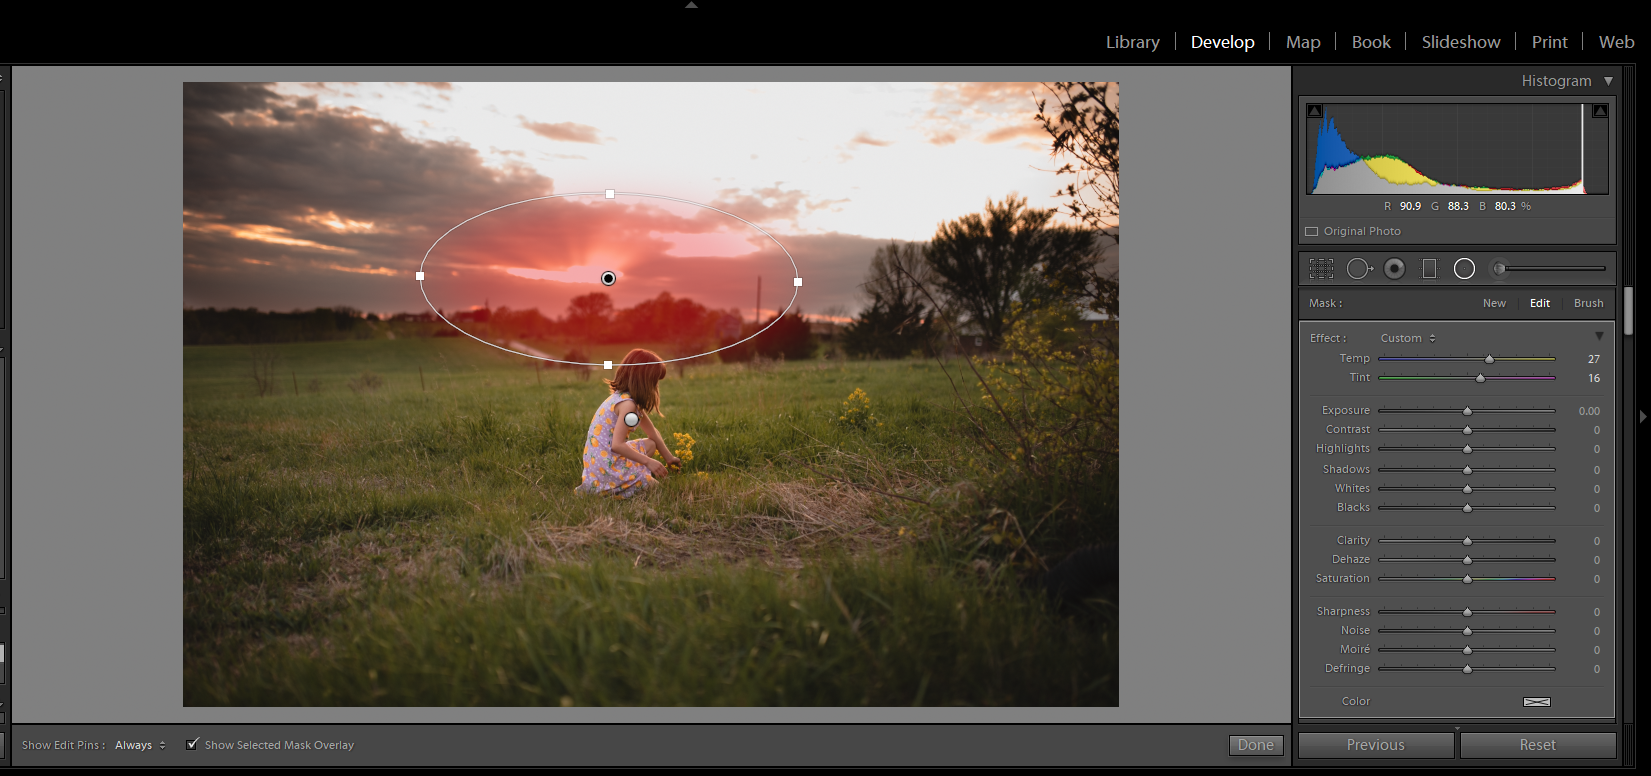
You could then see the rays of light coming from behind the clouds.  I decided I wanted to enhance that part.  So, I used the radial filter and put one right on top of the main light source (the sun).  I increased the temperature and the tint. Make sure that when you are using a radial filter that you click the invert button, or it will affect the entire picture other than where you put the filter. I use this often when enhancing light.

Radial Filter adjustment screenshot for how to enhance a sky lighroom tutorial, Columbus, IN

Here is my final image.

Lightroom tutorial, editing a sky, how to, Columbus, Indiana photographer

I hope you have enjoyed my tutorial! Please feel free to contact me with any questions you might have!