Why should I book a full session?

There are many reasons to book a full session.  Here are some thoughts you might be struggling with.

Opposing thought 1: “Hey, I only need one nice family picture!” Honestly, said no one ever.  It never works this way! By the time you’ve put all that work into hiring the right photographer, picking out clothes, getting yourself ready and your family ready, getting to that perfect location on time, you’re not going to want just one photo! You will want cute pictures of the children, and fun family shots!  This takes time, and you have already invested so much!

Photographer in Columbus, Indiana

Opposing thought 2: “It doesn’t take that long to get a good picture.”  That might be right for older children who will look at the camera and smile for that perfect traditional portrait.  But what about all those interactions in between that perfect shot?! What about your actual real-life family dynamics? I am telling you that it takes time to get used to being in front of the camera.  A quick 15-minute session is going to deprive you of genuine reactions and interactions. And just like you need warm up time, so does your photographer.  Sure, we can do everything to get those perfect shots quickly, but the more time you allow the more time the photographer can get those creative and emotionally deep shots! 

Photographer in Columbus, Indiana

Opposing thought 3: “I don’t have the time for a full session.”  Look, you’ve spent a ton of time getting ready. Getting your family ready.  You’ve bought the outfits, you’ve done your make up, and hair, you showed up on time.  This is no small feat! Make it worth it!

Columbus, Indiana Photographer, Callihan Photography

Opposing thought 4: “A whole hour of taking pictures sounds so painful.”  Oh man, I hear you on this one! I would hate to spend a whole hour in front of the camera forcing smiles and poses.  However, full sessions aren’t like this.  Of course, I want to capture that one perfect, over the mantle, everyone looking and smiling photo.  But sometimes the best ones come from forgetting the camera is there. With a full session you will have time to do an activity together.  Genuine real-life moments only come with time.  While mini sessions are great for getting that one perfect traditional photo, full sessions are invaluable for the candid moments.  If you or your children need time to warm up to the camera, a full session might be for you!

Columbus, Indiana Photographer

Opposing thought 5: “I don’t have the money for a full session”.  I get that, photography is an investment. But honestly, it all depends on what is important to you.  If you want an awesome experience and timeless photos that you will remember and love, then I would encourage you to make it a priority.  You can book as far in advance as you need. For me, I require 50% at the time of booking, so if you pay half now, you can pay the rest when your session is.  If that is a full year out, then you can start saving and getting excited for this important day! For example, you know you will want fall family photos or maybe you go pick out your own tree every Christmas.  Maybe there is a tradition you will want to document so that you can be fully present! If so, then I would encourage you to make a photo session your goal!     

Callihan Photography, Columbus, Indiana

Opposing thought 6: “I don’t need a full session, it’s just not necessary.”  Honestly, I am going to just encourage you to think about it! There is a lot of value in a full session.  It is an experience! The time, attention, details and storytelling are going to be that much better in a full session!  Artful photography is an investment. To book your session go to my contact page and reach out to me today! Thanks for reading!
Christmas Mini Sessions

Hi there, people! I thought I would share some of the pictures from the Christmas mini sessions I did in November. And what better time to share than a week (and a day) before Christmas! I hope you are savoring this Christmas season. If not, slow down and reflect on just how special this time is. Enjoy!

How to Replace a Sky in Photoshop

I have often found myself thinking, “this photo is really missing something”.  I have developed my own little method of replacing skies, and you might do it this way too! Either way keep reading! You might ask, why would you bother replacing the sky? Because, there are just some pictures that look better with clouds! Some photos need a little extra punch. Whether the sky was clear that day (like in my example) or you’ve blown it out trying to expose for your subject, I will show you my own method for replacing that sky in Photoshop.  Here are some before and after pictures where I have replaced the sky:

Before

Before

After

After

Before

Before

After

After

Before

Before

After

After

Before

Before

After

After

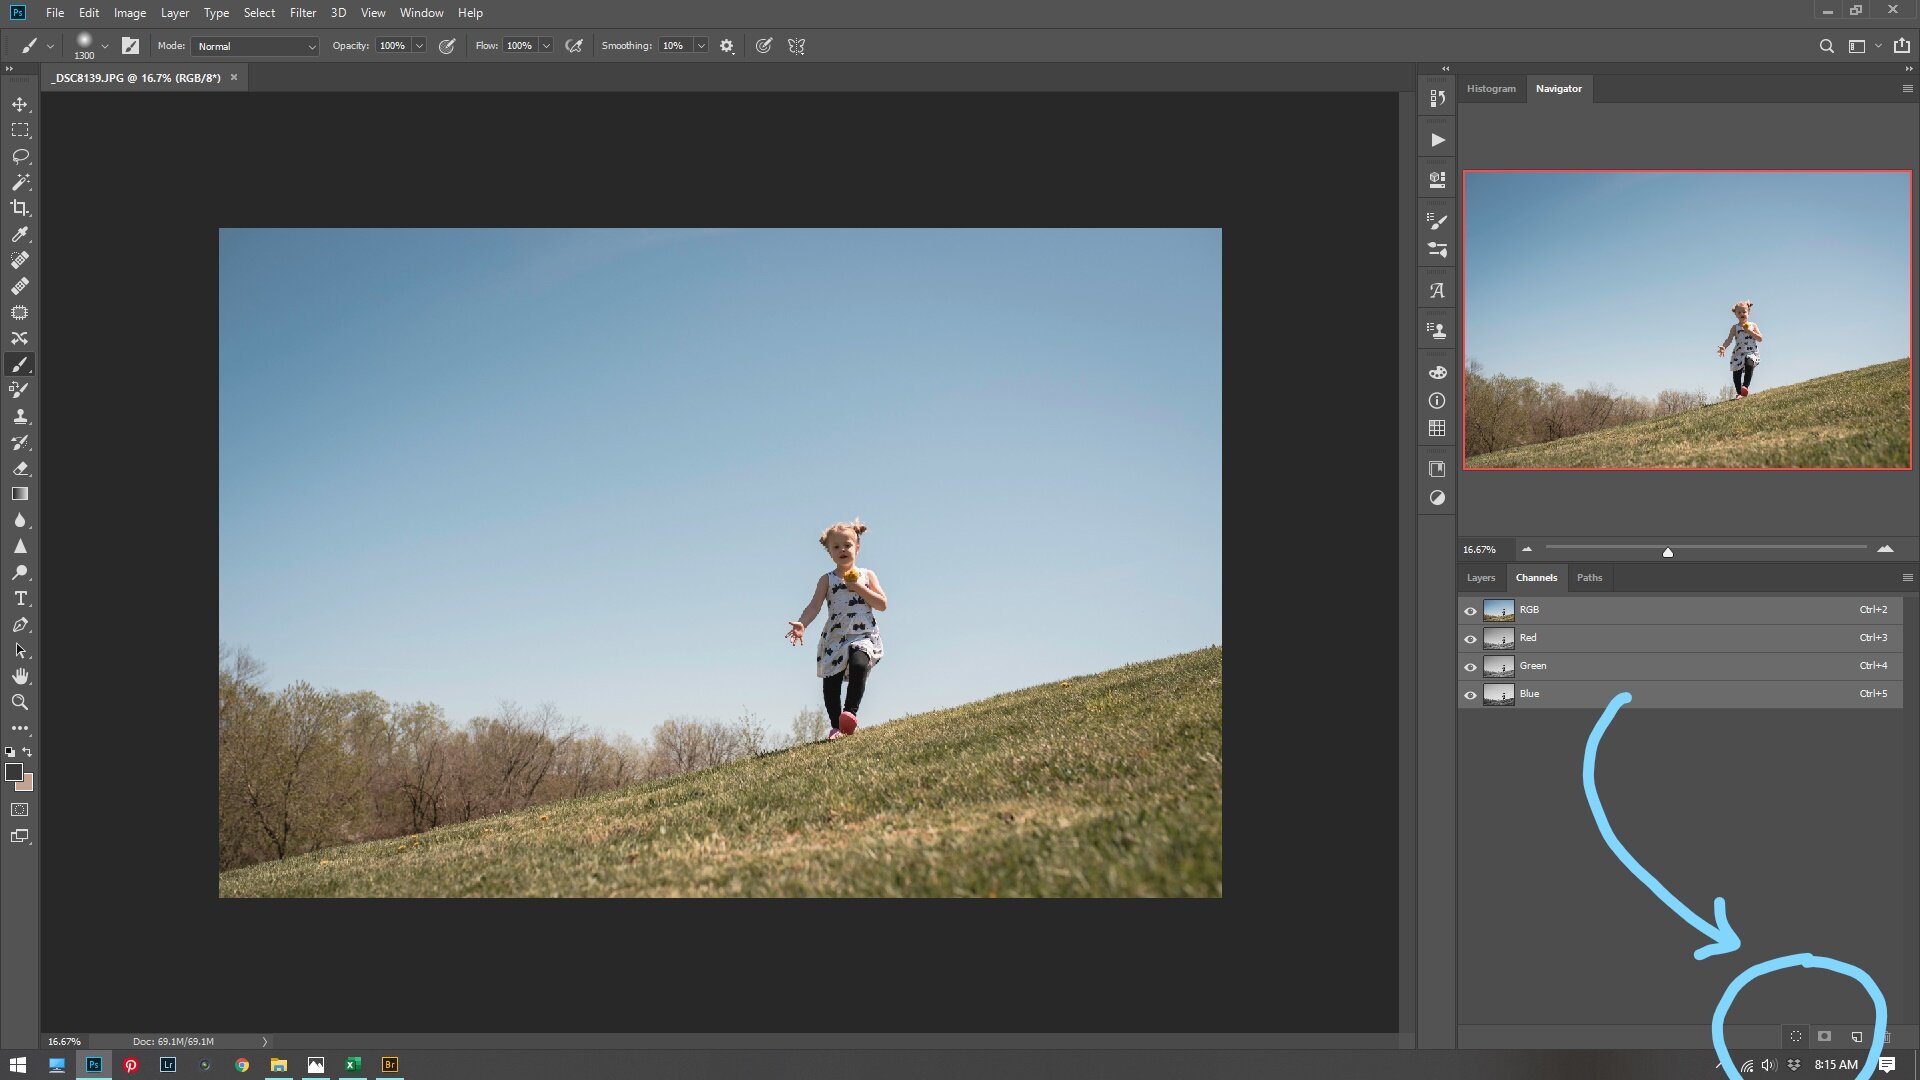
Now for my process.  First, bring your photo into Photoshop.  After making all your basic adjustments observe what kind of light is in your photo.  Is it hard light? Is it soft? Is it back light, or side light or midday light? In this photo you can see that it is midday and very hard light.  So obviously a back light sunset is not going to work for this photo.  I chose a cloud overlay from Jessica Drossin, but you can even use your own if you want!  Go ahead and bring the overlay into your work space on Photoshop. Place the clouds where you think they would look the best.  Then turn off your new cloud overlay layer by clicking the eyeball next to the layer.  Then go to channels.  Select all your channels by clicking the RGB channel.  Now drag your RGB channel to the little marching ants circle at the bottom right of your screen.  Like this:

Callihan Photography in Columbus Indiana
Columbus, Indiana

Now go back to your layers and turn back on your cloud overlay.  Then click the masking tool to add a mask, seen here:

Callihan Photography in Columbus, Indiana

After that it should look something like this:

Columbus, Indiana

Now this is the part where you panic and say, “WHAT HAVE I DONE!!!!” It’s OK.  Do not panic.  It’s going to look a little weird.  At this point, by masking the channels it has given you a good start.  The rest is going to be by hand.  Paint in your masking layer with a soft black brush at 100%.  Make sure to cover all your subject’s skin and hair and the ground.  Make sure there are no hard edges where your overlay ends. Use different opacity brushes to get around your subject if needed.  

Columbus, Indiana photographer

Next is just fine tuning.  Sometimes the sky needs lightened. So, I usually lower the opacity to make it blend better.  Sometimes, it will need more contrast.  Sometimes you will need to darken your subject to make it look right. I usually use a curves adjustment layer to do this. In this example I felt like it needed more contrast. So, I added a contrast and vibrance layer (as I felt it was getting a little desaturated).  

Columbus, Indiana local photographer

Here is the before and after of my example image:

Before

Before

After

After

This WILL NOT WORK EVERY TIME.  Sometimes you have a picture that you just can’t make this kind of selection.  Or sometimes it just looks weird.  Sometimes you need to try out a few different skies.  Whatever the case is, this is the best way I know how to select around your subject and blend the sky into all those tree branches.  Please give this a try!! And if you do, please share it with me!! I’d love to see what you’ve done! Thanks for reading!