Why You Should Create Self-Portraits

Creating artwork every day is HARD! I know I fail at this often. Life just gets busy and your camera is too far away. Like upstairs.  (I’m obviously speaking from experience, Ha!) The question is why should you create a self-portrait? Answer: Lots of reasons! 

blue-and-red-self-portrait-by-callihan-photo.jpg

Sometimes you need a cheap model to practice. 

That’s the truth! It’s hard to keep asking the people in your life to take their picture.  It wears them out, and it’s good for you to get yourself in front of the camera every once in a while. It’s also important to express yourself as an artist.  I know many photographers who are great at self-portraits. (Go here or here for an example.)  They use it to work through what they are feeling and experiencing.  It is important to stay inspired.  In order to stay inspired you can take a walk, draw, paint, try a new skill.  I like to try to recreate paintings or various artwork through photography.  For example: I used the painting by
Philip Alexius de László as my inspiration for the following photo.  

laszlo-portrait-painting.jpg
self-portait-13-laszlo-inspiration.jpg

For this next one I used a painting by Edward Hopper.

hopper.jpg
hopper-inspiration-self-portrait.jpg

Modeling in front of the camera helps you to sympathize with your subjects in your business and personal work.

Modeling is hard work. And when you get in front of the camera you will see just how hard it is.  Being able to move your own body in a way that translates into a good photo will help you direct your subject to carry out your vision when you’re behind the camera.  This is no easy feat! I know I am way more comfortable behind the camera rather than in front of it.  And now that I know that I can help my subject feel at ease.  Take notice if you are more comfortable looking away from the camera or straight at it.  I am a bit of an introvert, and I tend to like the ones where I am not looking right at the camera.  I am certainly more comfortable pretending the camera is not there!  Maybe that will translate to your introverted subject.   

self-portrait-by-callihan-photography.jpg

Getting in the frame is important for you as a photographer too! 

Often times we as photographers are missing from all of the family photographs.  It is important to get yourself in the frame, to document those moments with your kids and to just show who you are/were. Someone who does this beautifully is Meg Loeks.  She makes it a point to always take a self portrait on her birthday, and she is always getting in the frame with her kids.  Try not to be intimidated by her level of talent!  Your kids are going to want to see you in the photograph, not just endless pictures of themselves.  (Although, that can be fun too.) Remember a self-portrait can simply include the details.  It doesn’t have to be your face necessarily.

tulips-and-shoes-by-callihan-photo.jpg

How to do it:

I use the Nikon app on my phone called WMU. For Nikon you can find it here.  For Canon go here. It is very handy for cameras that have the wireless feature.  To turn on your wireless connection on your camera go to the set-up menu (the wrench icon) > Wi-Fi> Network connection>Enable.  Then use your phone to connect to your camera’s Wi-Fi. Then you can open your app, and you can choose to take pictures or view them.  Your battery must be charged to use this feature.  Using the app allows me to set the focus, which is perfect when you are using a shallow depth of field (wide aperture).  You can also use the self-timer.  You can choose however many photos you want at a time.  For this option, I have found it better to close down your aperture, for a wider depth of field.  It’s also good to set your focus with a stand in object, and then switch your lens to manual.  That way it doesn’t try to refocus when you walk in front of it, and you lose the focus all together.  If you don’t have a fancy digital camera, then just use the self-timer on your phone! Lastly, embrace the imperfections! Sometimes, you’ll have a whole set that is blurry.  But now is a good time to experiment. Remember, no one has to see them if you don’t want them to!

blurry-portrait-callihan-photography.jpg

I hope you found this helpful! Thanks for reading.

How to Capture Halloween Costumes

It’s almost Halloween! Can you believe how fast this year has gone by!? I am hoping that even with Covid-19 virus we will still have some kind of Halloween celebration.  It is not my favorite holiday, but it’s close! I love this time of year.  The leaves and the weather getting colder!  I love most everything about fall, but I do not care for pumpkin spice everything.  I’m happy with just normal coffee, ha! So here are some things to consider when photographing those Halloween costumes. 

1.       Set the Stage

Consider the costume itself! What setting should it be in? Is there something you can add to make the photograph extra special? For the sleeping beauty photo below, I used flower petals and a soft pillow to set the stage (so to speak).  When my daughter was Mary Poppins, I let her borrow my umbrella and let her play out the character!  It is so much fun to capture the costume in a way that speaks to the character they are playing. Hopefully, you have practiced the make up and have a plan for props! Sometimes it’s just one prop that can make all the difference.

sleeping-beauty-halloween.jpg

2.       Edit for Magic

Photoshop can really add magic to the photo.  Use it to help the scene!  You can use a glitter overlay like I did when my kid was Belle. This overlay is from Jessica Drossin.  Or you can edit the eyes out to make your ghost look extra creepy! For a Harry Potter costume consider adding a lightning bolt, or a smoke overlay for a witch!  Maybe do a composite, or make your subject levitate.  I have a tutorial here on how to do a levitation photo. The possibilities really are endless for a good photoshop edit! This is a really good time to start experimenting.

ghost-eyes.jpg

3.       Capture their Personalities

Make sure to document the way they laugh or their favorite part of the costume, or how much candy they got that year.  It might be a good idea to try to do pictures ahead of time too!  That way you have plenty of time for trick or treating. Don’t forget to capture those details!

witch-halloween-costume.jpg

Whatever you do, make sure to document these moments! It’s so fun to look back at previous years.  For more Halloween inspiration check out Kellie Bieser.  She is the master at capturing Halloween costumes!

halloween-costume-ideas.jpg

Thanks for reading!

The Zombie Edit

How to Make Yourself look like a Zombie in Photoshop

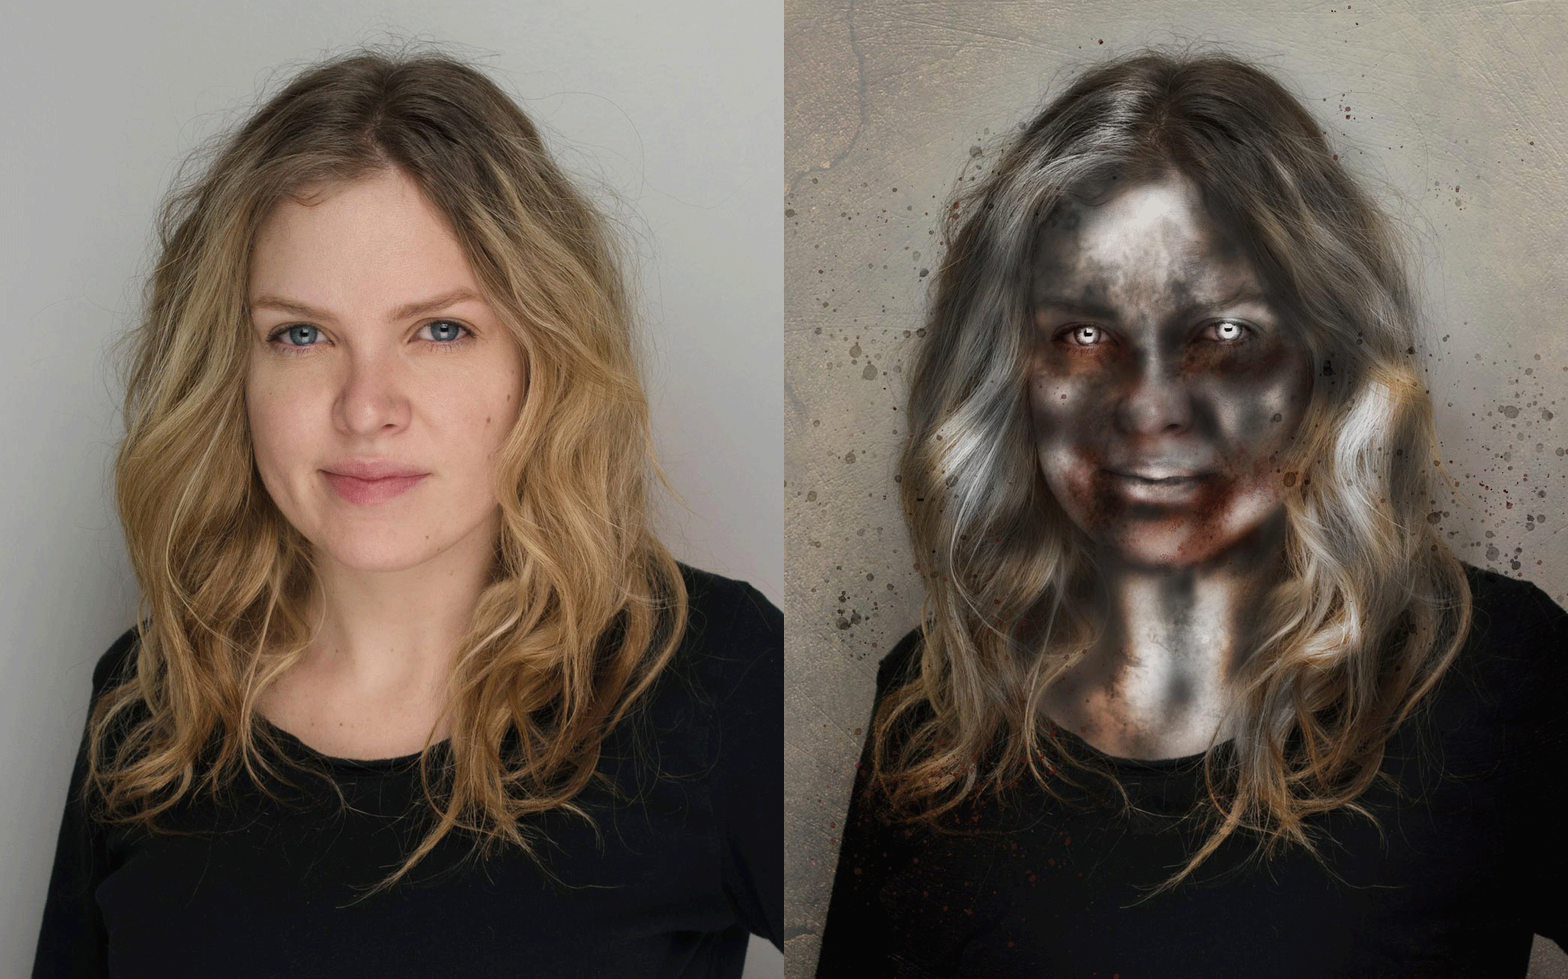
First you start with a lovely head shot, or any kind of portrait.  For this I used an old head shot of myself.  I then used the Dodge tool to overly lighten highlights on the skin, and on the eyes. Then I used the burn tool around the eyes, mouth, and hairline.   Next, I used the sponge tool to take away some of the color.  At this point the photo was still way too pink for a zombie.  Looking dead is the key! I then added a texture layer of a photo I took of a granite countertop.  You could easily do this yourself! I then chose to set the layer to “overlay”, and I masked off the parts I didn’t want it to cover. I then added a texture layer of a photo of dirt I took.  I literally went outside and just took a picture of dirt.  SO EASY! I chose to set the layer to soft light and masked off the parts I didn’t want to show through. I felt the image needed some grit. I think I got this next texture from Brooke Shaden.  If you haven’t seen her artwork you need to go look now! Here! I then added some gore with a soft paintbrush around the eyes, nose and mouth, and I set the layer to soft light. Then added more gore with a brush, I think maybe I got online here. Then I just add more shadows and depth. There you have it! Years of art lessons have finally paid off! Ha! If you are interested in having me “zombify” one of your own photos please contact me!  See my speed edit below.

zombie-before-after-gif.gif

Thanks for reading/watching!